Fixing VLC Audio Delay

thumbnail

Is your sound not syncing with video in the VLC player? This is always going to be annoying, and at worst, it can even totally change the video for you. Nothing impacts your enjoyment of a movie or show worse than everything just being slightly off.

Sometimes, the video might glitch, and the audio not matching the video will only last a few seconds. Often, though, the problem will go on for much longer and need you to take action to fix it. There may even be a bug whereby the audio and visuals always load desynchronized. This is incredibly annoying, especially if you can’t work out a fix.

VLC media player is popular and works on a huge number of devices, but there are some known bugs and problems that can crop up. This sync issue is one of them, and it occurs more often for Mac users. Plenty of people are looking for a solution.

How Can You Solve The Audio Delay in VLC Media Player?

If you wish to persist with the software, and try to fix the VLC player audio delay or mismatch, then there are a few things that you can try.

Keyboard Shortcut, Hotkeys

Hotkeys are available to help people quickly shift the audio and not have to go into complex settings menus. A couple of keys on the keyboard can tweak the audio to move it back or forward slightly.

This is only a short-term fix for the VLC audio synchronization issues. It only works for one playback, and the next time you launch the player, you will be back to square one. However, this might not be a big deal if you only plan on watching the video once to grab some information.

Mac users can press ‘G’ to push the audio back (slow it down) or ‘F’ to bring it forward. This is a quick way to move the audio around.

The player is simply tweaking the delay by 50 milliseconds every time. You can usually make VLC sync audio in this way, at least to the point where you don’t notice any delay. When you press the hotkey, you get a quick display showing you that the player has been adjusted. You do need to be eagle-eyed for perfectly syncing audio and video, plus, it is just a temporary solution.

Adjust VLC Audio Desynchronization Compensation

If you want to go into more detail and gain more control of syncing sound to video, then you can set the synchronization value in the settings of the player. This is another quick fix that doesn’t work in the long term. When another video loads, the synchronization will reset, whether you’re watching a TV show or a movie.


To change the audio track synchronization:

  • Go to the Menu bar once the video has been loaded within the VLC player.
  • Navigate to Tools and then Effects and Filters, where you’ll find the Synchronization tab.
  • Audio/Video gives you the option to enter a numerical value, which sets a delay on the video. A positive number sets the audio back, but a negative value brings the audio forward on the video.
VLC media player - Synchronization Tab
  • Click close and enjoy your video properly synced, with all audio and speech in the right place.

This can be frustrating if you don’t know how many milliseconds off the video is. It can be a guessing game requiring you to keep opening the same setting and changing the values until it syncs perfectly with the video in question. Plus, when you move on to the next video or even load the same one again, it is possible that the issue will be exactly the same.

Change Audio Track Synchronization

If you find that each time you open the VLC app, you are finding the sound and picture out of sync, you can take more permanent action in the media player. Before taking this action, make sure you consider the fact that this will change every video, so whether you’re streaming something live or watching a video for the 50th time, the synchronization settings will remain permanently.

The “audio desynchronization compensation” is the value you’re looking for if you find that the same lag is always in place on the videos you watch. This permanently changes the way the program can synchronize audio and video and puts the same shift into place for every single video.

If you wish to move ahead with making this change, you should open the VLC player and do the following:

  • Head to the Menu bar and find the Tools and then Preferences menu.
  • Navigate to the Audio tab within Preferences.
VLC app - Preferences Menu
  • In the “Show settings” option in the bottom left hand of the screen, check “all” to ensure that you are seeing every option.
  • Under the Audio menu, set the value on the “Audio desynchronization compensation” section.
  • Now, you need to tweak to the correct setting. Remember, you can use positive or negative values to move the audio and bring it backwards or forwards as required.
  • Continue to tweak until the video is absolutely perfect. The compensation should now have been repaired.

This is a permanent fix if there is some issue making the audio and video out of sync each time you load the app. However, if different videos have different levels of lag, then you might not find this is the best solution. It can take a while to get the perfect timing to sync the audio to the video, too.

Relaunch VLC App

Relaunching the app sometimes fixes things. This advice is true no matter what app you are using. If there is an error, there is often a good case for turning it off and then on again. There may have simply been a problem causing the VLC audio-visual sync to go out of place during playback.

VLC application window

By closing the VLC app and reopening it, then loading the video you wish to watch again, there is a good chance that you will end up with the video working perfectly and in sync. It only takes a couple of seconds and is worth a try before you take more drastic action. It is possible that restarting the app is all that is needed.

Immediate Solution to Sync Audio and Video Permanently and Get Rid of the VLC Audio Delay on MacOS

Mac users often experience synchronization issues with VLC, but this isn’t necessary if they switch to Elmedia. With software designed to open all sorts of media files on your Mac, there’s no more VLC audio delay.

Elmedia is designed to work perfectly on Mac OS and can play any format of video. The speech will be lined up perfectly when somebody’s mouth is moving, and you won’t need to spend ages tweaking settings.

With Elmedia, you can listen to audio or play visuals in so many different ways, including streaming to Chromecast, Airplay, or other DLNA devices that are out there. Elmedia is well-supported, which means there are many updates, and any issues that arise when the OS gets updated are quickly remedied. This isn’t always the case with software like VLC.

Some file formats will not natively play on your Mac, so Elmedia opens up a world of other video and audio options. On top of that, you don’t have to worry about converting files that were originally made for Windows or other devices, Elmedia recognizes the file formats and will play them natively on your Mac device. No need to install any complicated codecs in order to make the videos run smoothly.

Elmedia’s controls are simple, meaning you get many options on how you want to watch and control the video playback. In the rare case that you do experience any problems with synchronization, you can easily use the “Decrease/Increase Audio Delay” option.

It is also easy to install the software, just follow the steps below:

1. Install the Elmedia Player app

You can easily find Elmedia Player both on the App Store or from the Elmedia website and install the app just like you would any other. You may need to click “Allow” when prompted to download the file from the Elmedia site.

You can easily find Elmedia Player both on the

2. Drag the downloaded app to your Applications folder when prompted

Upon installation, you can place a shortcut within your applications folder or within your Dock if you wish. With the app open, you can choose the “Keep in Dock” option to ensure it stays accessible with a shortcut always available.

Upon installation, you can place a shortcut within your applications folder or within your Dock if you wish. With the app ope...

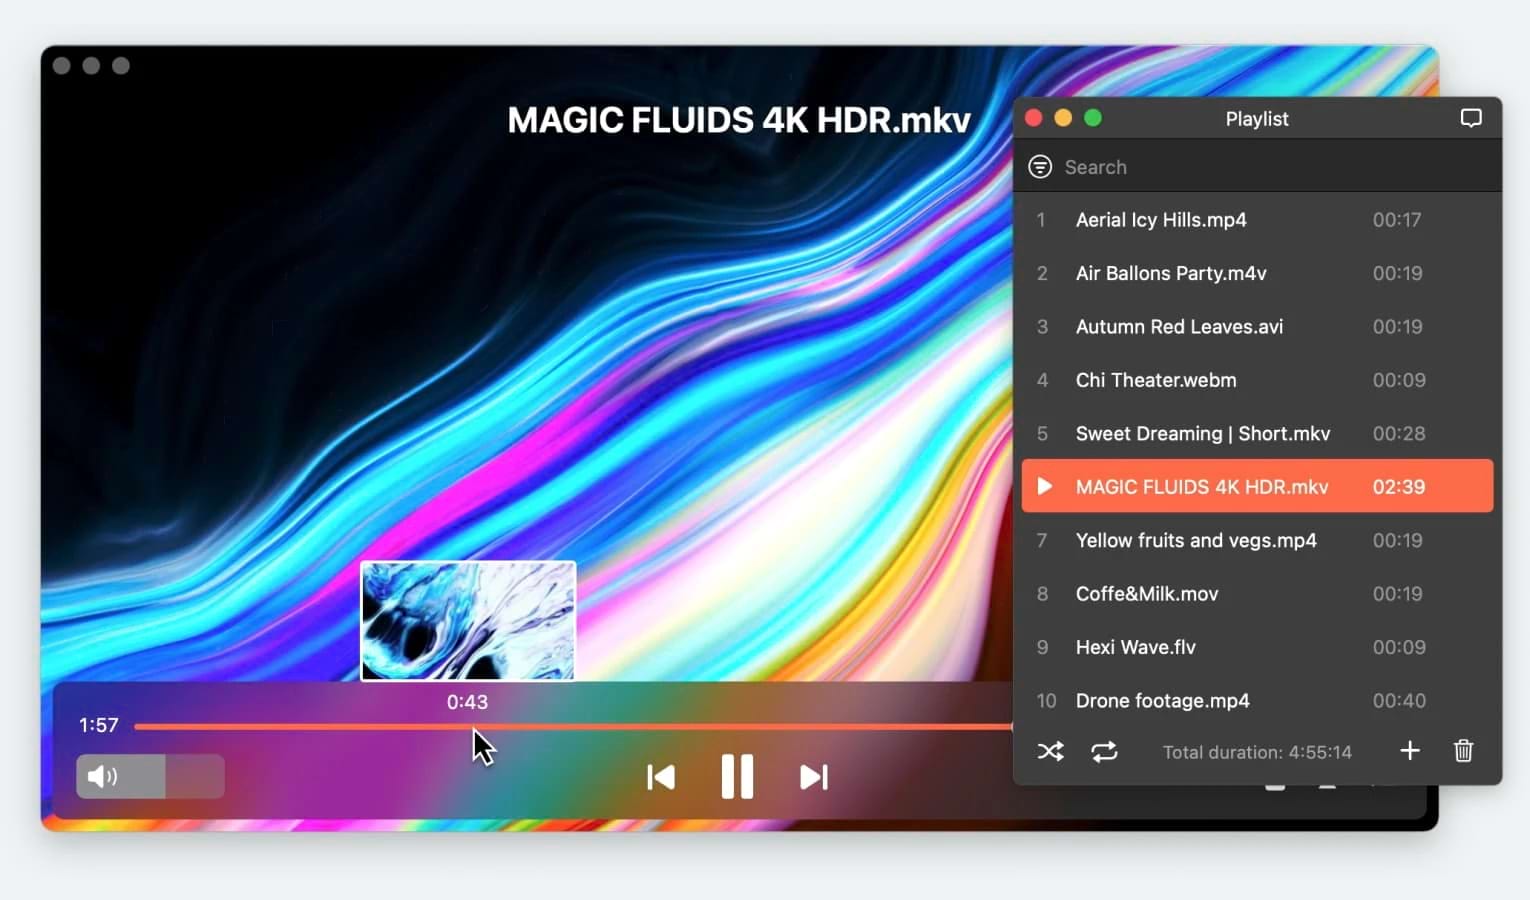
3. Launch the app and open your video file

There are actually a few ways to do this, including right-clicking directly on the video file and choosing to open with Elmedia Player. Double-clicking the app from your “Applications” folder will open Elmedia Player, and you can then drag and drop the file icon or search for the file within Elmedia.

Note: The first time you open Elmedia, you may need to click “Open” on a popup window. This is just verifying that you wish to download the app that you downloaded from the internet.

4. Change settings, including cast options

Elmedia Player gives you a lot of options for how to watch your video. You can use your Mac display, of course, but there are also ways to cast via Chromecast or other services, easily accessible via AirPlay.

5. Enjoy the video

No matter what the video file type, Elmedia Player will load your video and play it straight away. No problem with speech and voice synchronization, and plenty of control over volume, display, and much more.

Ready to enjoy media files on your Mac device without having to constantly tweak the audio and video? Learn more about Elmedia, the software that makes it simple to play many different file types on your Mac. Download Elmedia today to get started.

Frequently Asked Questions

This can happen due to a glitch opening the file, a corrupted file, or even errors in the output format when the video was exported. VLC does allow you to change the settings to sync the audio and video within settings or using hotkeys. However, it is a common issue with Mac users, who may benefit from using third-party software such as Elmedia Player for video playback.

Elmedia Player gives you the option to perfect audio and video synchronization. Reliable software such as this app also means it is less likely that the video will load with any issues, meaning that it is properly synchronized in the first place and any audio or speech and video work perfectly together.